Title: DIY Vacuum Food Packing Machine – Make Your Own Vacuum Sealer in Just 3 Minutes | Life Hack
Description:
Introduction:
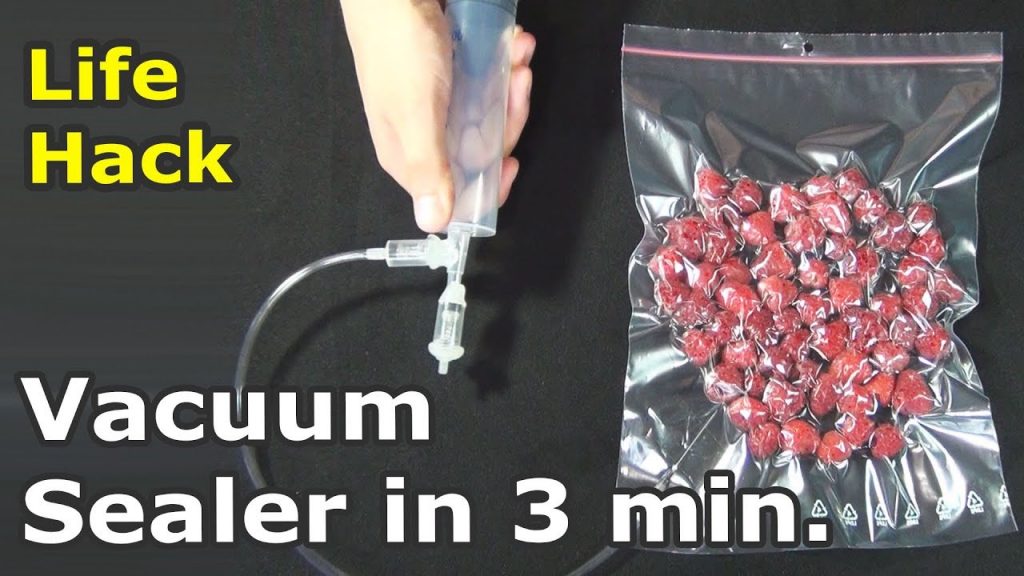
Welcome to our DIY tutorial on creating a homemade Vacuum Food Packing Machine, also known as a Vacuum Sealer. In this video, we will guide you through the simple steps to make your own vacuum sealer in just 3 minutes. Say goodbye to food spoilage and hello to extended freshness!
Video Content:
In this video, we will demonstrate the step-by-step process of making a DIY Vacuum Sealer for food preservation. Our homemade vacuum sealer is an excellent life hack that will help you protect your food from deterioration, whether you’re planning a relaxing riverside picnic, an adventurous camping trip, or simply dealing with perishable items in your refrigerator.
Key Points Covered:
1. Materials and Tools: We will provide a list of readily available materials and tools required for this DIY project.
2. Assembly: We will guide you through the assembly process, ensuring that each step is easy to follow and understand.
3. Operation Steps: Learn how to use your homemade vacuum sealer effectively to pack food items in airtight bags, preserving their freshness and extending their shelf life.
4. Benefits: Discover the advantages of using a vacuum sealer, including reduced food waste, improved organization, and enhanced food quality.
5. Cost-Effectiveness: Explore the cost-saving benefits of creating your own vacuum sealer, as compared to purchasing a commercial one.
Call to Action:
If you found this DIY Vacuum Food Packing Machine tutorial helpful, please consider liking, subscribing, and sharing our video with your friends and family. By doing so, you’ll help us reach a wider audience and continue creating valuable content like this.
Additional Tags:
Vacuum Food Packing, Vacuum Sealer, Food Preservation, DIY Vacuum Sealer, Homemade Vacuum Sealer, Vacuum Sealer Life Hack, Food Storage, Extended Freshness, Reduce Food Waste, Airtight Packaging, DIY Tutorial, Homemade Life Hack, Camping Essentials, Homemade Preservation Technique, Cost-Saving Solutions
Hashtags:
#VacuumFoodPacking #VacuumSealer #DIYVacuumSealer #FoodPreservation #LifeHack #FoodStorage #Freshness #ReduceFoodWaste #AirtightPackaging #CampingEssentials #CostSavingSolutions
Title: DIY Vacuum Sealer: An Easy Life Hack for Food Preservation
Introduction:
Are you tired of wasting food due to improper storage? Look no further! In this article, we will guide you through a quick and easy DIY project to create your very own vacuum sealer. By using everyday household items, you can preserve your food for longer periods and reduce waste. So, let’s get started on this simple life hack!
Materials Needed:
– A sturdy plastic bag (preferably with a zip-lock or resealable feature)
– A drinking straw
– A small container filled with water
– A marker or pen
Step 1: Prepare the Plastic Bag
Take the plastic bag and place your food item inside, ensuring it is properly sealed. If your bag does not have a zip-lock feature, use a regular bag and secure it tightly with a rubber band or twist tie.
Step 2: Locate the Straw Opening
Identify one corner of the bag where you can insert the drinking straw. Use your marker or pen to mark this spot, ensuring it is close to the sealed area.
Step 3: Create a Vacuum
Now, take the straw and insert it into the marked spot on the bag, making sure it is fully sealed around the straw. With one hand, hold the bag tightly around the straw, while using your other hand to submerge the bag (excluding the straw) into the container filled with water.
Step 4: Remove Air
Keeping the bag submerged, start sucking the air out of the bag through the straw. The water in the container will help create a vacuum as the air is drawn out. Continue sucking until you feel a significant reduction in air within the bag.
Step 5: Seal the Bag
Once you have removed as much air as possible, quickly remove the straw from the bag while maintaining a tight grip on the bag’s opening. As you remove the straw, simultaneously seal the bag tightly, ensuring no air re-enters.
Step 6: Test the Seal
To ensure an airtight seal, press down on the bag gently. If it feels firm and there is no air escaping, congratulations, you’ve successfully created your DIY vacuum-sealed bag!
Conclusion:
With this easy life hack, you can now preserve your food for longer periods, reducing waste and saving money. Remember to store your vacuum-sealed bags in a cool, dry place for optimal results. So, give this DIY vacuum sealer a try and enjoy the benefits of extended food freshness.Food Packing Machine
#Vacuum #Sealer #minutes #DIY #Life #hack #Vacuum #Sealer #food
Related posts:
 “Revolutionary High-Speed K-Cup Filling and Sealing Machine: Unparalleled Efficiency for Industrial Packaging”
 “Revolutionize Food Packaging: Unveiling 3 Sealer Reviews for Ultimate Product Preservation!”
 “Efficient and Affordable Pouch Filling and Packing Machine for Spice, Dry Fruit, Grocery, Grain, Granule, and Powder Products”
 “Efficient and Affordable Sachet Water Filling and Sealing Machine Available for Purchase”
 “Enhance Food Shelf Life with Innovative Nitrogen Filling Packing Machine”
 Revolutionary Standup Pouch Packaging Machine with Enhanced Flexibility and Efficiency for Filling and Packing
 “Revolutionary Automated Frozen Food Packaging System: Boosting Efficiency and Quality”
 Revolutionary Liquid Filling and Packaging Machine: Efficient, Innovative, and Exceptional
 “Innovative Packaging Solution for Dahi, Lassi, Chash, and Milk Cups: Affordable Filling and Packing Machine”
 “Top-Rated Commercial Vacuum Sealer: Ultimate Food Packing Solution for Freshness”