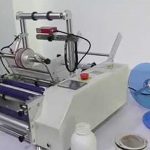
Title: Labeling Machine Price & How to Replace Price Tag Paper in a Labeler Gun (Model MX 5500) – Quick Tutorial Tips
Description:
Introduction:
Welcome to the official Ronald Ubod channel! In this video, we will provide you with valuable information about the pricing of labeling machines and guide you through the process of replacing price tag paper in a labeler gun, specifically the Model MX 5500 with label size 20x12mm.
Video Content:
In this tutorial, we will cover everything you need to know about labeling machine prices and demonstrate step-by-step instructions on how to replace the price tag paper in a labeler gun. Our quick tutorial tips will ensure you have a smooth and hassle-free experience.
Key Highlights:
1. Understanding Labeling Machine Price: We will discuss the factors that influence the cost of labeling machines, including their features, functionality, and brand reputation. By understanding the pricing structure, you can make an informed decision when purchasing a labeling machine.
2. Replacing Price Tag Paper: Learn how to replace the price tag paper in a Model MX 5500 labeler gun with the label size of 20x12mm. Follow our detailed instructions to ensure accurate and efficient label replacement, ensuring your labeling process remains uninterrupted.
3. Quick Tutorial Tips: We will provide you with time-saving tips and tricks to make the process of replacing price tag paper quick and efficient. These tips will help you avoid common mistakes and optimize the performance of your labeler gun.
Call to Action:
If you found this tutorial helpful, please consider liking the video, subscribing to our channel, and sharing it with others who might benefit from this information. Stay tuned to the Ronald Ubod Official channel for more informative videos on labeling machines and other related topics.
Additional Tags and Keywords:
Labeling machine, price tag paper replacement, labeler gun, Model MX 5500, 20x12mm label size, tutorial, tips, Ronald Ubod Official, good vibes, labeling machine price, labeler gun tutorial, labeler gun tips, labeler gun tutorial, labeling machine tutorial, labeler gun price tag paper replacement.
Hashtags:
#LabelingMachinePrice #LabelerGunTutorial #PriceTagPaperReplacement #MX5500 #RonaldUbodOfficial #GoodVibesChannel
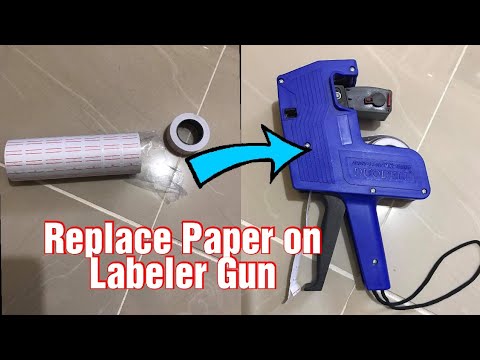
Title: Quick Tutorial: How to Replace Price Tag Paper in a Labeler Gun (Model MX 5500 – 20 x 12mm)
Introduction:
Labeler guns are essential tools for businesses to efficiently mark prices and organize inventory. Regularly replacing the price tag paper ensures smooth operations and accurate pricing. In this quick tutorial, we will guide you through the process of replacing the price tag paper in a Model MX 5500 labeler gun, specifically for 20 x 12mm labels. Let’s get started!
Materials Needed:
1. Model MX 5500 labeler gun
2. Replacement price tag paper rolls (20 x 12mm)
3. Scissors or a cutting tool (if necessary)
4. A clean and well-lit workspace
Step-by-Step Instructions:
Step 1: Prepare your Workspace
Ensure that you have a clean and well-lit workspace to avoid any distractions or accidental damage to the labeler gun or the price tag paper.
Step 2: Open the Labeler Gun
Locate the lever or button on the labeler gun that opens the compartment where the price tag paper is housed. Gently press or slide it to open the compartment.
Step 3: Remove the Empty Paper Roll
Once the compartment is open, carefully remove the empty price tag paper roll by pulling it out from the labeler gun. Dispose of the empty roll responsibly.
Step 4: Prepare the New Paper Roll
Take the replacement price tag paper roll (20 x 12mm) and remove any packaging or protective coverings. Unroll a small portion of the paper to ensure it feeds correctly through the labeler gun.
Step 5: Insert the New Paper Roll
With the labeler gun still open, align the new paper roll’s core with the spindle inside the compartment. Insert the core onto the spindle and ensure it fits securely.
Step 6: Feed the Paper through the Gun
Once the new roll is properly inserted, gently pull the paper end out from the opening of the labeler gun. Make sure the paper is threaded through the appropriate guides to ensure smooth feeding and printing.
Step 7: Close the Labeler Gun
Carefully close the compartment of the labeler gun, ensuring that it is securely snapped or locked in place.
Step 8: Test the Labeler Gun
To ensure the proper installation of the new price tag paper, test the labeler gun by printing a few labels on a scrap piece of paper or on a product. Check for alignment, clarity, and ease of use. If any adjustments are needed, refer to the labeler gun’s user manual.
Conclusion:
By following these quick steps, you have successfully replaced the price tag paper in your Model MX 5500 labeler gun for 20 x 12mm labels. Regularly replacing the paper will help maintain the efficiency and accuracy of your labeling process.Labeling Machine
#Replace #Price #Tag #Paper #Labeler #Gun #Model #x12mm #Quick #Tutorial #Tips
Related posts:
 Revolutionary Labeling System: Cutting-Edge Automated Labeling Machine for Unparalleled Efficiency
 Create Unique Labels with the Ultimate ₹900 Label Maker!
 “Maximize Efficiency with a Cutting-Edge Auto Bottle Holding and Detecting Labeling Solution”
 “Efficient Front-to-Back Automatic Labelling Machine with Wraparound Function”
 Unique Label Applicator for Square, Hexagonal, and Round Bottles: Optimal Sticker Labeling Machine
 “Ultimate Guide to Top Thermal Label Printers for 2023: Unbiased Reviews and Buyer’s Tips”
 Revolutionary Bottle Labeling Machine: Unmatched Efficiency at 80 BPM
 Unique Round Bottle Labeling Machine for Eye-catching Labels
 “Efficient Pressure Sensitive Labeling Machine – Up for Sale!”
 “Revolutionary Car Tags & Bags Labeling Machine for Unmatched Efficiency”